Captain's Spice Cabinet

How I did it
I was inspired to build the Captain's Cabinet when I saw a spice chest at my grandparent's house. I took measurements and made a SketchUp model so that I could build it. A few weeks later, I went to my local lumber yard and purchased a bunch of walnut and mahogany. Some of the lumber shown in the image was not used for this project, but instead for a speaker project that you can view here. I went home, milled it up, and went to town. The following images depict my process. This has been by far my most successful project.
Milling and Mortising the Legs
Since I built this cabinet from the bottom up, the first thing I did was mill up, cut, and mortise the legs. I first drilled out most of the waste with my drill press and then perfected the fit with sharp chisels. After the joinery was cut, I used a tapering jig on my table saw to taper the legs on two sides.


Fitting the Apron Rails
After the legs were cut and mortised, I cut and fit the aprons to their appropriate mortises. I then assembled the aprons and legs without glue just to make sure that all of my joints fit properly.
Assembling the Base
After the test fit, I applied glue and clamped everything together. The shavings and sawdust on my workbench are to fill any gaps that might appear. Luckily, my joints were tight enough that I did not need to fill any gaps!


Resawing the Case Sides
With the base all assembled and dry, I started on the case. I began by resawing some walnut and using my bar clamps to bookmatch 4 pieces–one for each side, one for the top, and one for the bottom.
Planing the Case Sides
After gluing together the 4 pieces, I hand planed each piece to get it perfectly flat. This took a while, but it is extremely important to have consistent thickness stock, especially when building cabinets.


Dovetailing and Assembling the Case
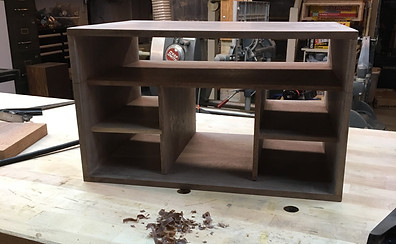
The next step after cutting the case sides to length was to dovetail them together. I used a dovetail saw and a set of razor sharp chisels to work the fit. I then glued the case together and let it sit for 24 hours.
Making the Drawer Dividers
The next thing I did was make the drawer dividers. This was a bit tricky because I needed the fit to be perfect because I did not have very much surface for the glue to stick to. After a few passes with a low-angle block plane, I got the fit I was looking for.


Fitting and Inlaying the Doors
After fitting and gluing the drawer dividers, I resawed a piece of genuine mahogany for the door fronts. I then used my plunge router with an edge guide to create a groove for my curly maple inlay to sit in. I glued the inlay in, trimmed it close to flush with a handplane, then sanded it all the way flush
Building and Fitting the Drawers
After the doors were built, it was time to make the drawers. I made the drawers out of Opepe, an African hardwood. Opepe is a has lots of natural oils, so the drawers will always remain slightly lubricated, allowing for easy opening and closing.

The Finished Product
This was my first real furniture project, and it came out so much better than I ever could have hoped. This piece was a true lesson in patience, accuracy, and wood selection.
